C#中GDI+编程使用的技巧总结
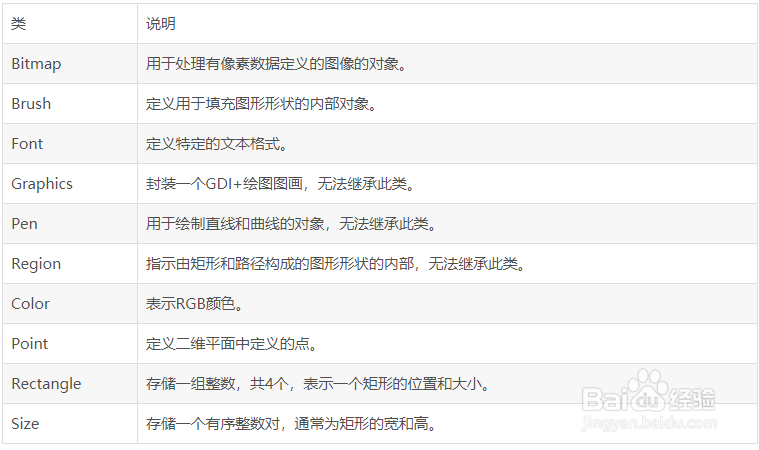
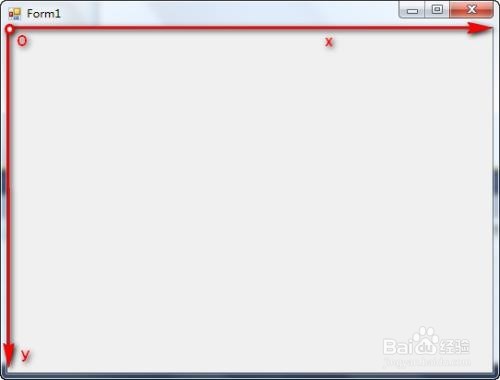
1、第一,我们先介绍一下。1 坐标系统(1) 坐标原点:在窗体或控件的左上角,坐标为(0,0)(2) 正方向:X轴正方向为水平向右,Y轴正方向为竖直向下(3) 单位:在设置时,一般以像素为单位,像素(Pixel)是由图像(Picture)和元素(Element)组成,是用来计算数码影像的一种单位。把影像放大数倍,会发现这些连续的色调其实是有许多色彩相近的小方点组成,这些小方点是构成影像的最小单位—像素。图形的质量是有像素决定,像素越大,分辨率也越大。2 命名空间 --- System.Drawing(1) System.Drawing 提供了对GDI+基本图形功能的访问(2) System.Drawing 常用基本类及结构

2、技巧一:全局坐标——变换对于绘图表面上的每个图元都会产生影响。通常用于设定通用坐标系。下程序将原定点移动到控件中心,并且Y轴正向朝上。/先画一个圆Graphics g = e.Graphics;g.FillRectangle(Brushes.White, this.ClientRectangle);g.DrawEllipse(Pens.Black, -100, -100, 200, 200);//使y轴正向朝上,必须做相对于x轴镜像//变换矩阵为[1,0,0,-1,0,0]Matrix mat = new Matrix(1, 0, 0, -1, 0, 0);g.Transform = mat;Rectangle rect = this.ClientRectangle;int w = rect.Width;int h = rect.Height;g.TranslateTransform(w/2, -h/2);//以原点为中心,做一个半径为100的圆g.DrawEllipse(Pens.Red, -100, -100, 200, 200);g.TranslateTransform(100, 100);g.DrawEllipse(Pens.Green, -100, -100, 200, 200);g.ScaleTransform(2, 2);g.DrawEllipse(Pens.Blue, -100, -100, 200, 200);

3、技巧二:局部坐标系——只对某些图形旅邯佤践进行变换,而其它图形元素不变。protected override void OnPa足毂忍珩int(PaintEventArgs e){Graphics g = e.Graphics;//客户区设置为白色g.FillRectangle(Brushes.White, this.ClientRectangle);//y轴朝上Matrix mat = new Matrix(1, 0, 0, -1, 0, 0);g.Transform = mat;//移动坐标原点到窗体中心Rectangle rect = this.ClientRectangle;int w = rect.Width;int h = rect.Height;g.TranslateTransform(w/2, -h/2);//在全局坐标下绘制椭圆g.DrawEllipse(Pens.Red, -100, -100, 200, 200);g.FillRectangle(Brushes.Black, -108, 0, 8, 8);g.FillRectangle(Brushes.Black, 100, 0, 8, 8);g.FillRectangle(Brushes.Black, 0, 100, 8, 8);g.FillRectangle(Brushes.Black, 0, -108, 8, 8);//创建一个椭圆然后在局部坐标系中进行变换GraphicsPath gp = new GraphicsPath();gp.AddEllipse(-100, -100, 200, 200);Matrix mat2 = new Matrix();//平移mat2.Translate(150, 150);//旋转mat2.Rotate(30);gp.Transform(mat2);g.DrawPath(Pens.Blue, gp);PointF[] p = gp.PathPoints;g.FillRectangle(Brushes.Black, p[0].X-2, p[0].Y+2, 4, 4);g.FillRectangle(Brushes.Black, p[3].X-2, p[3].Y+2, 4, 4);g.FillRectangle(Brushes.Black, p[6].X-4, p[6].Y-4, 4, 4);g.FillRectangle(Brushes.Black, p[9].X-4, p[9].Y-4, 4, 4);gp.Dispose();//base.OnPaint (e);}
4、技巧三:Alpha混合Color.掂迎豢畦FromArgb()的A就是Alpha。Alpha的取值范围从0到255。0表示完全透明,255完全不透明。当前色=前景色×alpha/255+背景色×(255-alpha)/255protected override void OnPaint(PaintEventArgs e){Graphics g = e.Graphics;//创建一个填充矩形SolidBrush brush = new SolidBrush(Color.BlueViolet);g.FillRectangle(brush, 180, 70, 200, 150);//创建一个位图,其中两个位图之间有透明效果Bitmap bm1 = new Bitmap(200, 100);Graphics bg1 = Graphics.FromImage(bm1);SolidBrush redBrush =new SolidBrush(Color.FromArgb(210, 255, 0, 0));SolidBrush greenBrush =new SolidBrush(Color.FromArgb(210, 0, 255, 0));bg1.FillRectangle(redBrush, 0, 0, 150, 70);bg1.FillRectangle(greenBrush, 30, 30, 150, 70);g.DrawImage(bm1, 100, 100);//创建一个位图,其中两个位图之间没有透明效果Bitmap bm2 = new Bitmap(200, 100);Graphics bg2 = Graphics.FromImage(bm2);bg2.CompositingMode = CompositingMode.SourceCopy;bg2.FillRectangle(redBrush, 0, 0, 150, 170);bg2.FillRectangle(greenBrush, 30, 30, 150, 70);g.CompositingQuality = CompositingQuality.GammaCorrected;g.DrawImage(bm2, 300, 200);//base.OnPaint (e);}