网页布局实例之瀑布流
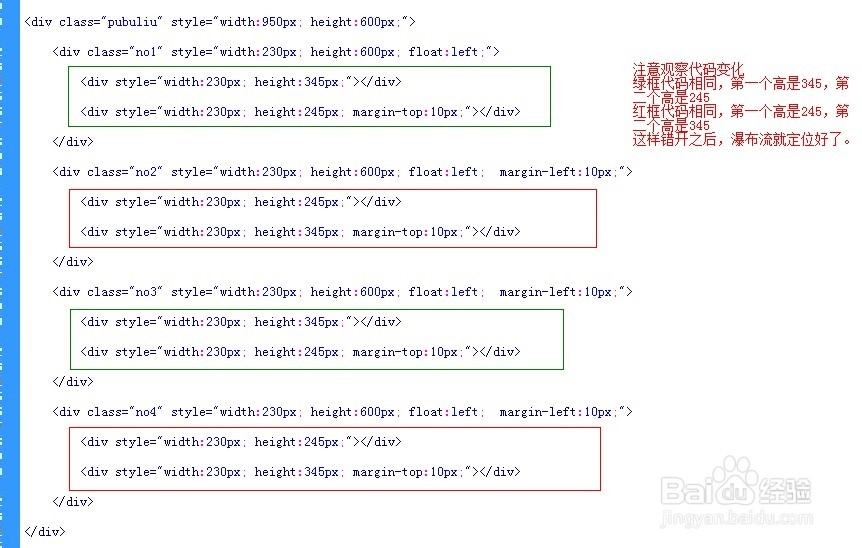
1、分析一下大概思路 在外层DIV 宽950,高600,里层有四个DIV,宽230,高600,向右浮动,分别间距10像素,里层四个DIV中的每个DIV中又分别有两个div,第一个宽230,高345,第二个宽230,高245,隔一个DIV调整div的顺序,就实现了一高一矮错开的样子,形成了瀑布流
效果如下图,至此,思路已经明朗,瀑布流的效果基本体现出来了,接下来用实际代码体现

2、最外层DIV结构如下:
<div class="pubuliu" style="width:950px; height:600px;">
</div>
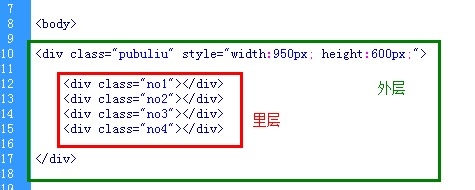
3、里层四个DIV结构如下:
<div class="pubuliu" style="width:950px; height:600px;">
<div class="no1"></div>
<div class="no2"></div>
<div class="no3"></div>
<div class="no4"></div>
</div>
4、分别设置class值为no1、no2、no3、no4的样式值
<div class="pubuliu" style="width:950px; height:600px;">
<div class="no1" style="width:230px; height:600px; float:left;"></div>
<div class="no2" style="width:230px; height:600px; float:left; margin-left:10px;"></div>
<div class="no3" style="width:230px; height:600px; float:left; margin-left:10px;"></div>
<div class="no4" style="width:230px; height:600px; float:left; margin-left:10px;"></div>
</div>

5、分别在class值为no1、no2、no3、no4的里层,分别加入两个div,一个高为345,一个高为245,宽均为230的标签,第二个距第一个10像素,最终代码如下:
<div class="pubuliu" style="width:950px; height:600px;">
<div class="no1" style="width:230px; height:600px; float:left;">
<div style="width:230px; height:345px;"></div>
<div style="width:230px; height:245px; margin-top:10px;"></div>
</div>
<div class="no2" style="width:230px; height:600px; float:left; margin-left:10px;">
<div style="width:230px; height:245px;"></div>
<div style="width:230px; height:345px; margin-top:10px;"></div>
</div>
<div class="no3" style="width:230px; height:600px; float:left; margin-left:10px;">
<div style="width:230px; height:345px;"></div>
<div style="width:230px; height:245px; margin-top:10px;"></div>
</div>
<div class="no4" style="width:230px; height:600px; float:left; margin-left:10px;">
<div style="width:230px; height:245px;"></div>
<div style="width:230px; height:345px; margin-top:10px;"></div>
</div>
</div>
6、至此,瀑布流就定位好了,我们只需要在各自地坑位里填入自己想要显示的内容就行了,如图片,文字等。